Installation Guide

To print the “Installation Guide” kindly click the following PDF to download and then print – Click here to download “Product Installation Guide”

General Wood Guidelines

Please read and understand these guidelines prior to handling or installing this material.

1. Delivery

Your material from Crisp will arrive at the job site via a third-party freight carrier. It will arrive in bundles wrapped with breathable lumber wrap and labelled for easy identification; there will be foam sheeting between all good faces to prevent damage to the finish. Please note that the consignee is responsible for unloading materials.

If using a forklift, be sure to center the forks on the lift and grab entirely beneath the bundle. Please use caution when unloading these bundles and be sure to inspect the units for damage that may have occurred in transit. If offloading with a crane, the use of forks are mandatory; using lifting straps may damage the wood.

Freight claims can only be accepted if reported at the time of delivery. A quick visual inspection should determine if damage has occurred during transit. If any damage is noticed at the time of delivery, please notify both the freight driver & Crisp immediately. Once the material is safely offloaded, please move bundles to a covered area to reduce the adverse effects of weather exposure.
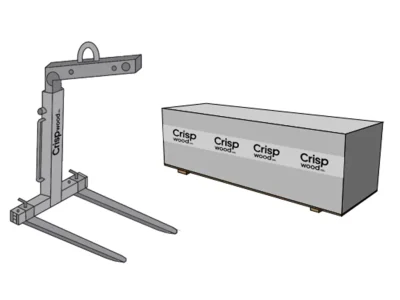
crisp wood img

2. Inspection

Visually inspect the material to verify quality and quantities. Each bundle will be labelled with a packing slip to identify the product within the bundle and its respective quantities. Crisp requests that shortages, damages, or any concerns about the material be reported and documented within ten (10) days of delivery.

Do not install any material considered defective, and report any questions or concerns immediately to Crisp. Installation of material will be considered
final acceptance of colour and quality.

3. Jobsite Storage

Bundles or loose pieces of Crisp wood need to be stored properly so that the material is not adversely affected by exposure to rain, direct sun, concentrations of moisture, or other harmful elements. The material should also be protected from dust, overspray of any kind, or general damage that can occur in construction zones. Crisp strongly recommends the bundles and any material be stored under a covered area such as a garage. If a covered area is not available to store the material under, please protect the material by means of a waterproof tarp or covering (breathable or “vapor-open” plastic to allow for proper ventilation). Loosen the lumber wrap and install wood spacers between the wood and the lumber wrap so the wood receives proper airflow and can begin to acclimate to its environment. Please make sure the materials are elevated on stringers at least 6” above the ground, and that any covering used will allow for proper ventilation around all sides of the crate. If moving or re-stacking material, please re-use foam sheets to protect the finish.

4. Acclimation Of Wood

Wood is a natural material and will respond to its environment, so proper acclimation and an assessment of the moisture content (with a moisture meter) is necessary to achieve maximum performance. All exterior woods can and will move to some extent with changes in the climate, so the wood needs to reach an equilibrium moisture content (MC) prior to installation by providing proper airflow around the wood. Reaching an equilibrium MC in the wood means that the MC stabilizes and will not move up or down over the course of several days in normal conditions. Kiln-dried woods (i.e. Cedar, Hemlock, etc.) could take up to 2 weeks to fully acclimate to its environment. Do not install any material that has been wetted or experienced any extreme changes in temperature, humidity, or exposure.

5. Mock-up Material

Mock-up (test) areas are highly recommended by Crisp if there are any questions or concerns about the appearance or installation of the material. A mock-up will allow all parties involved to assess the appearance of the wood, understand installation methods and put a proper plan together for the installation of the full batch of material. Installers with experience in prefinished wood are strongly recommended for handling these materials.

6. Fasteners

Using appropriate fasteners will directly affect the longevity and structural performance of your material. Even the best woods on the market will fail if inappropriate fasteners are used. Crisp strongly recommends stainless steel fasteners. Nails can be hand-driven or installed with a pneumatic nail gun. If a pneumatic nail gun is desired, reduce the airpressure, and tap nails flush with a nail set. The nail must penetrate at least 1.25” into a solid wood substrate. Crisp cannot warrant any material installed with improper fasteners. These guidelines regarding fasteners apply to average environmental conditions – extremes in heat, humidity, precipitation, wind and other environmental conditions may require different fasteners or fastening techniques. Screws can offer superior holding power vs. nails.

7. Field Cuts

All field cuts, specifically cut ends and ripped edges, must be sealed prior to installation. The ends of the boards will need to be trimmed/squared up and sealed prior to installation. An alkyd oil end grain sealer can be applied and installed without the sealer fully drying before installation. The sealer can be applied with a foam brush or end-cut applicator. Crisp includes a can of stain for end cuts and touch-up stain with every order.

8. General Handling On Jobsite

Please be sure that the material is handled with caution, as natural wood can be damaged more easily than other manufactured products. Wood is relatively soft, and the finishes can be delicate, so proper storage and handling is important for minimizing damage. Longer boards should be removed from the crates with care; two people at each end are recommended for transporting and installing boards to reduce damage. Improperly removing a board from its bundle can damage the finish or the finish of other boards.

Installation Guidelines

1. Exterior Cladding

A. VENTILATED CLADDING SYSTEM (RAINSCREEN)

Proper ventilation is important for all wood products. Trapped moisture or prolonged exposure to moisture can cause swelling and adversely affect the structural performance of any wood product. A ventilated cladding system a.k.a. “rainscreen” style installation will greatly increase the longevity and overall performance of the wood and is strongly recommended for the vast majority of exterior siding installations. This method provides an open air space between the finish and the exterior sheathing, minimizing exposure of moisture to the wood siding. The exterior finish should have 8-12” of clearance from the ground, and top and bottom air vents should exist, allowing for air circulation fully around the siding.

B. FURRING STRIPS

Crisp wood siding should be installed over a standard 16” on-center stud built wall with exterior sheathing and a weather barrier over top. In order to create an air gap for the rain screen assembly, the wood siding should be held off the exterior sheathing with furring strips, which will ensure uninterrupted ventilation and drainage behind the siding. Remove any materials that may hinder airflow or drainage. There are many different options for furring strips, but we typically recommend 1x pressure-treated lumber. Using pressure-treated lumber is optional but should be prioritized in extreme climates with significant moisture. Standard nontreated lumber can be used in moderate climates. All lumber furring must be kiln-dried, straight, and without splits or nail holes to ensure a proper fastening base. As always, please consult with your licensed siding installer and general contractor to determine their preferred and recommended type of furring strip & installation methods.

- HORIZONTAL SIDING

For siding installed horizontally, use vertical furring strips placed over each stud location at a maximum spacing of 16” on-center (see Figure A). Nail the strip into the stud every 12-16” vertically up the stud. It is the installer’s responsibility to ensure the furring strips are properly secured to the structure.

- VERTICAL SIDING

For siding installed vertically, use vertical counter battens to hold the horizontal furring strips off the exterior sheathing and maintain an uninterrupted drainage plane (see Figure B). In this assembly, the vertical counter batten material & thickness is essentially irrelevant as it merely serves to float the horizontal furring strips off the exterior sheathing. The horizontal furring strips, however, should be a minimum 2x lumber in order to provide a proper fastening base and to avoid compromising the weather-resistant barrier (WRB).

C. STARTER STRIP

In order to prevent rodent or insect infestation within the wall cavity, we recommend using ventilated “starter Strips” or standard staple screening at the top and bottom of every wall.

D. FLASHING

Prior to installing Crisp wood siding, please be sure that flashings are also installed to prevent moisture from entering into wall spaces. Flashings are a critical component that direct water away from the building and toward designed drainage paths. Moisture can accumulate behind the exterior finish as a result of rain penetration through the siding, water vapor diffusion, or leakage of moist air from the interior or condensation. Install horizontal flashing at the top of all wall penetrations, like windows and doors, as well as at any change in materiality or material direction. Crisp wood siding should be at least 1/4” above the flashing l edge. Do not caulk where the flashing and trim or other materials meet. Please note that caulking in lieu of flashing is not an acceptable alternative.

E. GROUND CLEARANCE

To avoid the wicking of moisture into the wood, Crisp Wood siding should never be in contact with the roof or ground. Wood siding should have no less than 8-12” of ground clearance, separated by a trim board (or skirtboard) of a water-resistant material. You should also maintain a minimum clearance of 1” from adjacent horizontal structures (i.e. deck, low wall, trim) and 2” from the roof.

F. INSTALLING TONGUE & GROOVE (T&G)

To avoid the wicking of moisture into the wood, Crisp Wood siding should never be in contact with the roof or ground. Wood siding should have no less than 8-12” of ground clearance, separated by a trim board (or skirtboard) of a water-resistant material. You should also maintain a minimum clearance of 1” from adjacent horizontal structures (i.e. deck, low wall, trim) and 2” from the roof.

G. INSTALLING LAP SIDING (SHIPLAP)

Shiplap siding can be installed both horizontally and vertically. For boards 6” or under in width, use one fastener 1” up from the exposed lap. For planks 8” and wider, face-fasten two courses per board with the fasteners 2.5” to 3” apart, allowing for expansion and contraction without splitting.

H. INSTALLING SQUARE EDGE OR SMOOTH FOUR SIDES (S4S)

Square siding or square trim can be installed both horizontally and vertically. For all S4S boards, face-fasten two courses per board with the fasteners 2.5” to 3” apart, allowing for expansion and contraction without splitting. Due to the open joint between S4S planks, a UV-resistant weather barrier is required. Any lumber furring should also be protected with suitable weather-resistant joist tape.

J. SPACING

For end/butt joints, an expansion of 0.8% (65% RH – wet) needs to be considered. Never install boards butted up tight against any other construction elements, including wood. Provide roughly an 1/8” gap when meeting other construction elements like window & door trim, corners, or any dissimilar materials. Provide roughly a 1/4” gap when meeting any metals to avoid staining. Provide roughly a 1/16” gap between butt joints of a similar wood material. Weather cut and seal these ends and ensure that they land over a stud or furring strip for proper fastening.

K. THE DO’S & DON’TS OF WOOD SIDING

DO:

DON’T

Sidebar

Product Enquiry